All of our past newsletters and tips on these drills are compiled and updated here (if you hate reading, this material was also presented in a recent webinar, although there’s certainly some value in reviewing both). These things matter—the no-tillers who are consistently attaining the highest yields are meticulous about maintenance and adjustment of their seeding equipment. Can’t afford to do it right? Think about how much money you spend on seed—you might be able to knock quite a bit off that bill, and have more uniform stands to boot, just by some attention to the seeding equipment. Not to mention thin stands have more weed issues, and you know how much those cost to control!
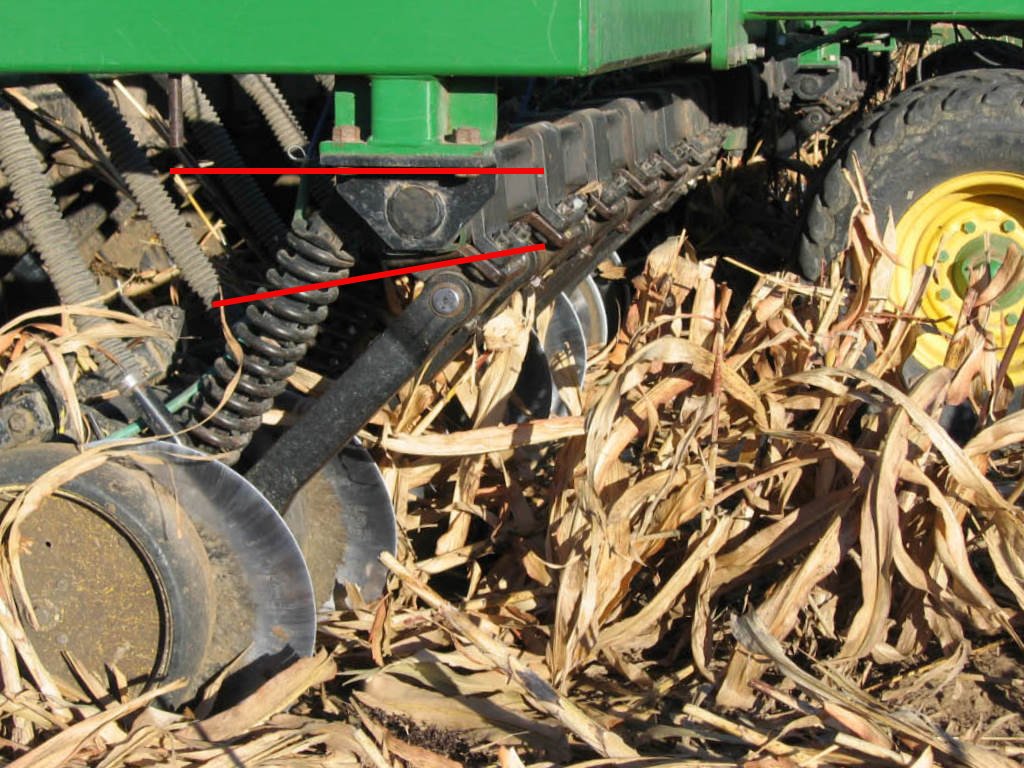
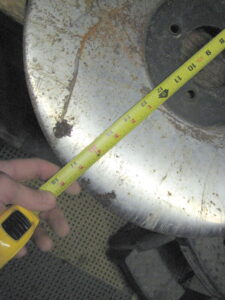
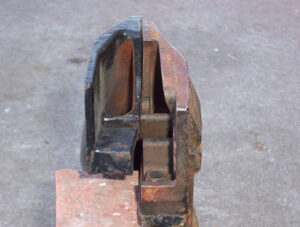
1) For firm seedbeds, make sure the down-pressure is sufficient to keep the opener at the proper depth (this is especially important for crops such as winter wheat which can suffer more winter injury and winterkill if the crown is too shallow). For JD 50/60/90/ProSeries drills, this requires the rockshaft be sloped downward in the rear (see photo) by 10 – 15 degrees, occasionally 20. (The JD Owner’s Manual is wrong in specifying it be horizontal all the time, which is the appropriate setting only in tilled soils.)
Note, however, that the drill frame shouldn’t lift excessively when the openers are lowered and the down-pressure engaged. This typically requires additional frame weight to be added, and sometimes quite a lot (often many dozens of suitcase weights on 30-, 36-, and 40/42-ft air drills, * and the wings especially need a lot; 50- and 60-ft frames are enough heavier that they usually don’t need extra ballast). The extra ballast is far more effective the farther rearward it is on the frame: Due to the leveraging action of the opener arms, the rear of the drill is far more likely to lift than the front. The very best place is over the transport wheels, and Exapta will soon offer a bracket to hold suitcase weights at this location on the wings. (*We’ve put as much as 8,000 pounds on a 36-ft drill on 7.5-inch spacing in tough conditions, and this certainly wasn’t overkill.)
The key to understanding the down-pressure adjustment on these drills is that the torque on the rockshaft simply is compressing the huge coil spring on each opener, but only if the drill frame isn’t allowed to lift too much.** In fact, the easiest way to compare down-pressure in different scenarios (or with your neighbor’s 50/60/90/ProSeries) is to measure how much compression of the big coil spring you’ve achieved, and the large rod going thru the middle of the spring allows you to do just that (it protrudes out the bottom of the casting when the spring is compressed). In extremely mellow conditions, you might only need 1 inch of compression. In typical long-term no-till, however, 1.75 – 3″ is necessary. Btw, ignore all of Deere’s warnings about not operating in the red zone on their gauge—there are dozens of drills that’ve each ran tens of thousands of acres in the red (often at 1500 – 2000 psi), and there’s no premature failure of opener bearings or anything else. Indeed, running enough downforce reduces wear on the depth adjustment bracket (it’s not rattling around as much), the opener main pins, and all the other pivots because the opener doesn’t bounce as much; it also cuts down on the seed-lock wheel smacking the back of the boot so often. One weakness that does show up with the extra downforce, however, is the rockshaft (these can be beefed up—the first job of your seeder is to get a good stand, so do whatever it takes).
**Slight rolling-under of the openers is beneficial to seed placement, since it tilts the seed boot into a more vertical position so that the seed is dropping farther forward in relation to the blade (it’s the same thing we’re doing by running planter row units slightly nose-up, and the trajectory of the seed on these drills is much farther from vertical than it is on planters). Slight rolling-under means the frame has lifted a little. But too much frame lifting impairs the ability to compress the big coil springs enough to keep the openers in the ground at a reasonably consistent depth. Also, by rolling the opener under slightly, the big coil spring is more effective at creating downforce as compared to a flatter angle, assuming the same degree of compression for both angles (think about it this way: if the spring were horizontal, it wouldn’t supply any downforce at all; if it were completely vertical, it would be maximally effective, and at 45 degrees, it provides half of that) (incidentally, the 50-series drills operate with the opener more vertical than the 60/90s, so they develop downforce more readily, and do a better job with seed placement—but don’t have as much clearance in transport). But you don’t want the frame to continue to lift or else you don’t get as much compression of the springs as what you need, so use plenty of ballast when it’s hard and dry and you’re using both ranks of the drill. How much frame lifting is acceptable? If the rear transport wheels are off the ground, that’s a bit much.
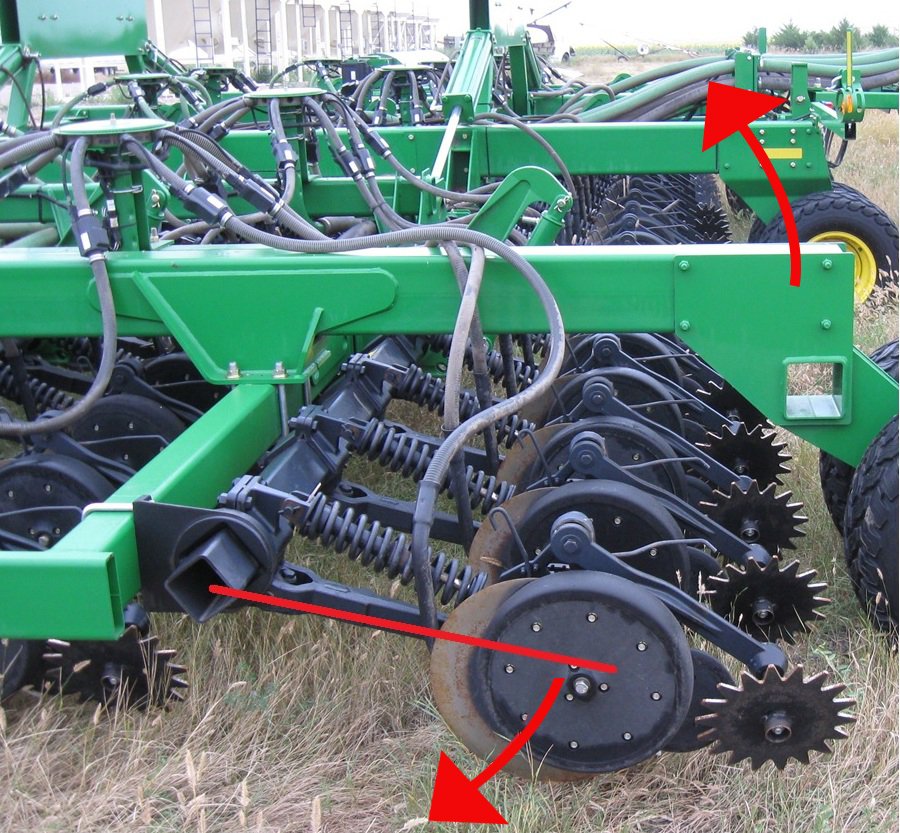
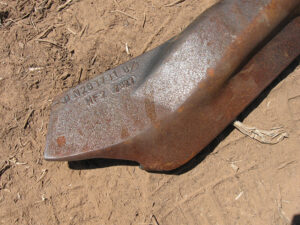
2) Make sure the opener blades are sharp with a deep bevel (compare to new), and this is especially important for slicing thru tough stalks such as soybeans. For best results, replace 50/60/90/ProSeries blades when bevel is down to 0.45 – 0.5″ and definitely before you get too only 3/8″ bevel remaining which is as dull as they’ll ever get (and we were saying this long, long before we sold blades for these drills). When installing, be sure to put the bevel away from the gauge wheel (i.e., towards the boot). In other words, the bevel is towards the furrow being cut (this is the opposite of how double-disc planters are set up). Single-disc opener blades don’t cut well at all if they’re installed backwards. Avoid putting oversize blades on these drills. Stick with 18.0″—see our other newsletters on blade size and blade wear for more discussion of opener blades. If you really want to improve cutting action, as well as greatly improving depth control (while minimizing sidewall compaction and making better use of frame weight), see our UniForce hydraulic down-pressure system.
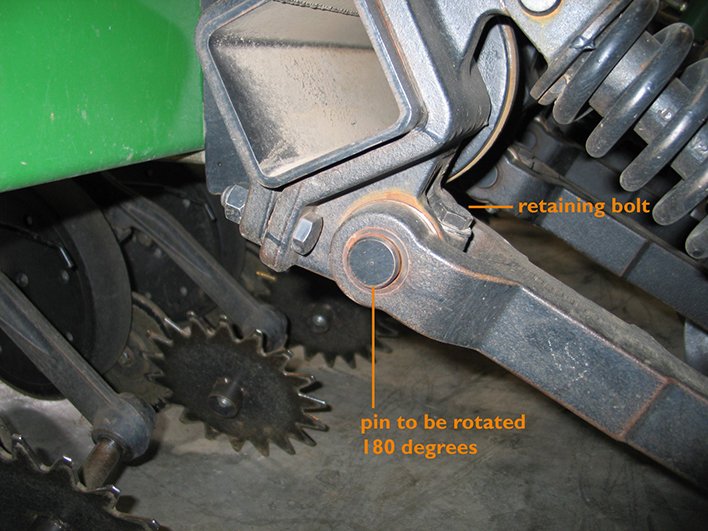
Another highly important aspect of cutting the furrow is making sure the blade runs at something close to the angle when new (7° to direction of travel), so check your main pins (where the opener arm attaches to the rockshaft) for slop by shoving the entire opener side-to-side. A slight bit of play doesn’t matter, but if the unit moves more than ¼” side-to-side at the blade, this area needs attention. The first time around, the main pins can simply be rotated 180 degrees (loosen the retaining bolt, then use a pipe wrench on the end of the main pin). If that’s already been done and you still have slop, it’s time for a rebuild. Note that there’s a lot of variation in quality of pins and bushings out there—we carry the super high-quality pin & bushing kits from Australia, which will last at least as long as OEM, and offer smoother action in the meantime due to Teflon-coated bushings (better quality than OEM at a fraction of the price!). You won’t find a better pin & bushing kit anywhere. When finished with rotating or replacing main pins, be sure to re-torque the retaining bolt to spec (very high), or else the bushings may start turning in the arm and ruin the arm.
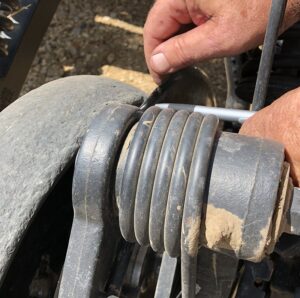
3) Make sure the seed boots aren’t starting to wear out (see photos). Check the up/down slop in the seed boot attachment point! Even on a brand-new 50/60/90 drill, this play is excessive and should be reduced by installing a metric bolt to take out some of the slop (note that you don’t want to eliminate all movement—there needs to be a little for the boot to align flush with the blade, and to let straw clear out). For drills that have substantial wear in this spot, rebuild it with one of the kits on the market—but be careful not to remove all the movement, which causes catastrophic plugging in heavy straw, and also makes the bolt more likely to shear in rocky conditions.
There are three types of repair kits for the boot attachment holes: A) The first requires drilling out the holes in the ears of the opener ‘shank’ to accept a sleeve. Use a drill-bit guide, as you must have the boots set up flush against the blade when finished! And use plenty of anti-seize on the bolt, or it will rust solid to the sleeve. Again, there should be at least 1/8″ (and possibly 1/4″) up/down movement at the rear edge of the boot when finished to be sure they don’t plug in heavy straw. B) Another is Pro-Stitch’s, which uses jacker bolts to hold the boot in alignment with the ears. However, don’t eliminate all the movement if you use this method (and don’t listen to the company about reducing down-pressure to prevent plugging). C) Probably the best method is to use a shoulder-bolt clamped tight thru the holes in the ears. The boot then rotates on this shoulder-bolt, rather than the bolt rotating in the ears. You can create a bit more wiggle by reaming the holes slightly.
Before embarking on the labor and expense of boot attachment repairs, I would investigate whether using a metric bolt will take up enough slop to be acceptable. On ordinary bolts, they need to be longer than OEM so that the nut tightens down on the bolt (runs out of threads) before it clamps down on the ears. Two reasons for this: clamping the ears tight can result in breaking them; and, having exposed threads on the bolt below the nut is a weakness that makes them much more likely to shear.
When replacing boots, beware of the many low-quality ones that don’t fit properly. Some are real junk.
The leaf spring should have enough strength to snap the boot back against the blade with a sharp ‘clang,’ or else it is weak or broken. To check, lift the firming arm up, pull the boot away from the blade, and release it. Exapta’s replacement springs are 20% stronger than OEM, and more affordable besides.
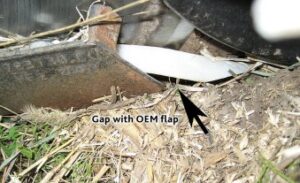
Make sure the seed bounce flaps are intact on the back of the boot, as they’re very important in controlling seed bounce. If you haven’t yet upgraded to our Ninja flaps, check them out—a very simple, highly effective upgrade. JD is proud of their new seed flap on the ProSeries, which is thicker than their older version, but it’s still inferior technology. Our patented Ninja flap is miles ahead for seed placement—and the Ninjas never break off, and their wear-life is at least 3x longer than any other flap on the market (indeed, we don’t know of anyone who’s actually worn any out).
On air drills, keep the air velocity low to minimize seeds being blown and/or bouncing out of the furrow (or install air diffusers, such as our SeedVU, and/or diffusers in the secondaries), but not so low as to plug primaries (if you aim a secondary straight up into the air doing a test-run, the product should blow about 18 inches up; 60 inches is too much, but just burbling out a few inches is on the verge of plugging). Also, a lot can be gained by routing the secondaries to be more vertical—extra air must be used to push seeds or fertilizer out of sags in secondaries. Indeed, getting the secondaries more vertical is very important to getting the most from SeedVUs, but should be done even if not running SeedVUs (this is also why SeedVUs are rather useless on the 50- and 60-ft drills—too many secondaries are horizontal or even uphill in spots). Note, however, that I would get everything else as good as possible before deciding if you need secondary diffusers—fix the seed boot attachment point, install Ninja flaps, run enough downpressure on openers.
4) Another item that’s key to getting seeds to the bottom of the furrow is not letting the sidewall blow apart prematurely. Don’t use RID gauge tires. We prefer narrow, standard-shape gauge tires with no indentation whatsoever up next to the blade (see our newsletter for more discussion of the various types, including where urethane gauge tires are appropriate). Note that MudSmith’s narrow rubber gauge tires have the requisite softness, are 20% thicker (almost double the wear life), and have a nice shape—Deere’s have too much indentation and are too hard. The MudSmith gauge tires also fit on the standard (non-spoked) rims.
Make sure the gauge wheel is shimmed so it lightly touches the blade at the rear (where the blade is trying to lift the sidewall); if the gauge wheel touches at the front but is gapped at the rear, it means the arm holding the gauge wheel is bent.

While we’re talking about gauge wheels, we assume you use the depth adjustment occasionally 🙂 If you have trouble with these seizing up, have a look at our newsletter about Fluid Film and other rebuild tips for the depth-adjustment shaft.
(to be continued—firming and closing steps)
For more info on drill setup and adjustment, see the Tech Tips for Drills webpage, and our DVDs No-till Seeding Explained, and No-till Seeding School (in-person on August 9th, or DVD).