Guide to No-till Seeding
The following Guide was prepared in 2002 and has achieved something of a reputation for its insight. The Guide can be read as a general ‘how to.’ Our specific recommendations for particular seeder models are found in the Tech Tips section, along with an illustration of the four Steps of No-till Seeding. For a printer-friendly pdf of the Guide, click here.
Guide to No-Till Seeding
The state of existing technology and our understanding by Matt Hagny (3rd Sept. 2002)
The perfect no-till seeding tool has yet to be built or even conceptualized. We are always limited by our imaginations, by physical laws, and by economics. Therefore, we will have to ‘make do’ with something less than ideal. While there’s probably a hundred ways of doing seed placement reasonably well, there’s millions of ways of screwing it up (and we seem to learn them all the hard way). Getting good value in seeder performance begins with understanding the components’ design and function, as well as what interactions may occur.
If no-till seeding ever seems to get complicated or confusing, it may be good to bear in mind that really the task at hand is simple, and was accomplished very effectively by the Aztec planting stick, which was among the very first no-till seeding tools (a forerunner was the animal hoof on the prairies, as in Dwayne Beck’s “buffalo-one, buffalo-two” description, with the first animal’s hoof pressing the seed down, and the second one covering it with dust). Unlike the buffalo, the human agriculturalists actually intended to do seeding of the species they had selected and had devised a tool to do it better. Anyway, the planting stick was probably invented many times by early farmers (and is still used in some areas today), and provided everything we have on modern seeders: precise depth control at the point of seed drop (markings on the stick, used as a guide for making the furrow during the first jab of the stick), seed singulation (counting how many seeds go in each hole), seed firming at the bottom of the ‘v’ (the second poke of the stick, after the seeds go in), followed by separate furrow closing (a scuff of the foot, to cover the hole with loose material). Sometimes pop-up fertilizer was used, in the form of a dead fish or similar material. Basically, all we have done is mechanize the process further, and do it in a bigger way. In some cases, our ‘modern’ seeding technology is considerably less precise than those planting sticks.
Openers
The blade is the business end of a seeding tool – it all revolves around that component. Why a blade and not a knife? A knife, hoe, sweep, or other sliding opener will work somewhat acceptably in dry loose conditions, but not nearly so well in moist conditions due to smearing. Also, these openers have some issues with depth control as well as soil disturbance, residue flow, low ground speeds, and high draft loads. They have been traditionally favored due to their low cost and ability to ‘furrow down’ to reach moisture in tilled systems. Many of these things must be re-evaluated in no-till. Quite often the value of increased precision of seed placement will alone justify the conversion to disc-type openers. For these reasons, we will focus on disc openers.
The furrow being created needs to be wide enough to get a large seed planted, such as a very large corn kernel, or a kabuli chickpea, or a pinto bean. While we commonly have implements that create a ‘v’-shaped furrow with either one or two opener blades running at a slight angle, this is not the only shape possible, nor are all the ‘v’s created by the various openers all the same shape – some taper much more quickly than others, for instance, while others have a flat bottom. The shape of the furrow will be determined by the angles at which the blade or blades run, as well as their size (also, there’s the possibility of concave or dished blades, but we won’t go into that here).
The blade’s angles of operation and size are critical and interrelated. The angles involved are the offset from the true direction of travel (let’s call it x — sorry if this seems like algebra), and the tilting from true vertical, if any (y, here — sometimes called ‘camber’). Like this:
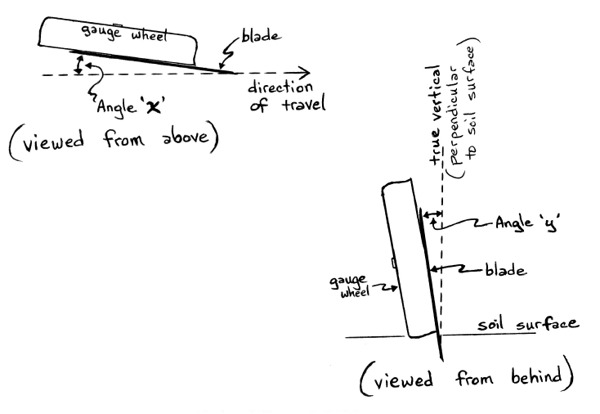
The angle x needed is partly related to the size of the blade: larger diameters need less offset angle. Further, if two blades are running together to create the furrow, with each doing 50% of the work, the angles should be roughly half of what is needed on a single-disc opener (note that it is also possible to have a double-disc design where one blade does all the work of creating the ‘v’ while the second blade runs in the ‘shadow’ created by the first – sort of a rolling seed boot). Large blades need less angle x than a smaller blade would to make the same furrow.
Once there’s a few degrees of angle x, the amount of tilt from vertical (y) and the direction of that tilt will determine how wide the top of the furrow will be in relation to the depth: a blade tilted toward the outside (away from the furrow) creates a wider ‘v’ at the top. However, a blade running perfectly vertical, but still with some angle of x (say, seven degrees), still creates a ‘v’, although without as much tapering (i.e., not as wide at the top). A blade running at the same seven degrees of angle x but tilted inward a couple degrees would create a furrow that is still more uniform in width from top to bottom. The reason all this is important is that creating a wider furrow at the top takes more down-pressure to maintain depth, creates more compaction of the sidewall, and takes more horsepower to pull — these problems increase drastically with depth. There are no advantages to having a wide ‘v’ at the top – it is basically an engineering hangover. On the other hand, having a ‘v’ that is too pinched at the bottom creates some problems with getting the seed placed & firmed at a consistent depth (more on this later). Ideally, the furrow would be as narrow as possible, and the sides of the ‘v’ would taper very little.
What size blades are best? Too small and they have the tendency to slide when they encounter a gob of wet residue, instead of rolling on up and over it. Plus, they wear out more quickly. Very large blades may cause more hairpinning of crop residues and take more down-pressure to maintain depth, as well as creating some other engineering obstacles.
Single vs. double-disc? The choice is determined by other factors. Double-disc openers are often perceived as more precise, but this need not be the case. A single-disc opener with well-designed components may be every bit as precise. Note that double-disc openers do have more problems with hairpinning than do those with only one cutting edge, as with either an offset design (where one blade leads the other slightly) or a pure single-disc design.
Achieving Blade Depth and Controlling It
The next major item is pushing the blade or blades into the ground and then limiting that depth. Something limits the depth of the blade, whether it is simply the amount of weight & down-pressure available, or limited by some positive mechanical device, such as a depth-limiting wheel mounted on the opener. In the case of a wheel, two main types exist: those operating alongside the blade, and those trailing behind (I guess it would even be possible to have one ahead of the blade). Often, the depth-gauging wheel serves some other function as well, such as seed firming & furrow closing (as is often the case with trailing ‘press’ wheels), or heave limiting as is often done with ‘gauge’ wheels running alongside the blade. (Occasionally you’ll also see a design where a wheel running alongside the blade limits heaving – i.e., a ‘wiper’ wheel – but isn’t built to limit the depth of that blade. Look carefully.)
Both types of depth limiting have drawbacks. In the case of press wheels, often the furrow isn’t adequately covered to a consistent depth, the seed isn’t firmed into the ‘v’ consistently, and the filling material over the seed may contain voids and/or be very highly compressed. Much of this is due to the high down-pressure requirements of no-till (once the blade reaches its depth, the rest of the down-pressure is on the gauge or press wheel), and the structured nature of the soils (they don’t readily collapse back over the furrow, and resist being pressed shut by surface pressure). Press-wheel designs will work okay in no-till soils that are very sandy but have serious shortcomings in nearly all other conditions.
One of the downsides to true gauge wheels is the additional compression of the sidewall (holding it down while the blade pushes sideways), as well as extra expense, since something else must now do the firming and closing. Also, sometimes mud becomes trapped between the wheel and blade. Some attempts to avoid these problems involve moving the gauge wheel fore or aft, spacing it out away from the blade, tilting it away from the blade, or putting indented gauge tires on. These arrangements often do allow the soil to lift to various degrees while the blade is coming up out of the soil. The downside is soil heaving and poor seed placement. The heaving is a concern from the standpoint of planting weed seeds, destroying or burying surface residue cover, and dislodging mud that will stick to other opener components; however, a little heaving is probably acceptable. The seed placement problem is much worse, particularly in certain clayey no-till soils: the lifting by the blade creates lateral fissures in the sidewall, which are often large enough to capture a bouncing seed. Depending on how seed-firming is accomplished, and how dense the chunk of sidewall is over the seed, the results can be rather ugly. Even if a seed lying under a chunk of sidewall manages to germinate, its path of emergence will be tortured – either meandering thru the fissures in the compressed sidewall, or growing laterally over to the ‘v,’ then up. Sometimes the seedling never emerges, coiled up under the sidewall in a futile attempt to get out. Those that do emerge from under the sidewall will be greatly delayed in relation to the seeds in the ‘v,’ essentially becoming weeds. I have seen corn seedlings whose coleoptiles only needed to go 2″ to emerge yet actually zig-zagged around so many chunks that they traversed more than 5 inches! Those late plants didn’t produce much of an ear. Uniform timing of emergence is every bit as important as good spacing within the row.
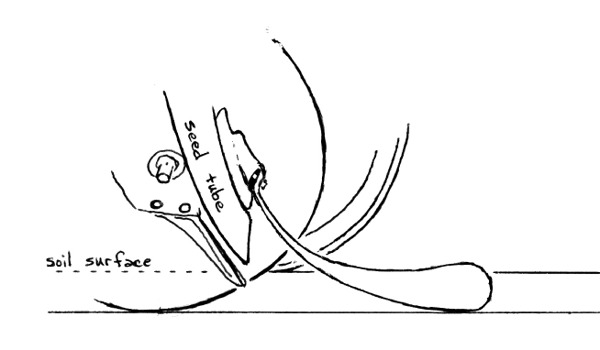
The best position for the gauge wheel seems to be so that it’s contacting the soil just about where the blade is exiting the soil. This does result in slightly more sidewall compaction but keeps the sidewall intact until the seed is securely in place, which is crucial (at least until someone dreams up another way of doing it – e.g., placing and firming the seed before the sidewall has a chance to lift and fracture). The crux of the matter is the sidewall being the only guide for getting the seed to the bottom of the ‘v’ once it leaves the seed tube or boot – none of them go all the way to the bottom of the furrow; almost all of them stop an inch or more above the bottom of the ‘v,’ which is somewhat necessary to accommodate blade wear and mud clearance. This drawing accurately depicts the seed tube shape on a very popular planter design, and is typical of all modern planters:
Not many innovations have occurred in gauge wheel design in the last couple of decades, with one notable exception: narrow gauge tires. Without the need for staying afloat in fluffy soil, there’s not much reason for having them 4 inches wide, and many no-tillers would prefer not to trample so much residue. A trend is afoot to convert to 2- or 3-inch-wide gauge wheels, which makes some sense (note that it does move the compaction closer to the furrow – nearly all gauge wheels carry most of the load on their outside edge). Another concept floating around is to use sensors and a control system to measure how much pressure is on the gauge tire and then cause the down-pressure system to adjust continually to maintain some amount (say, 20 pounds) of pressure on the gauge tire.
I’ve talked about limiting depth, but what pushes the blade into the soil in the first place? Down-pressure is often achieved by coil springs that transfer weight from the frame (toolbar) onto the opener, although this can also be done with hydraulic cylinders or air bags. Sometimes hydraulic cylinders are used to twist a rockshaft, which compresses a spring or springs on each opener. Whatever is used, ideally it will exert about the same amount of force on the opener regardless of where that opener linkage is in its stroke. And, of course, sufficient frame weight will be needed to give the leverage system something to push against. Note that down-pressure and ballasting requirements become higher as ground speeds increase, and will vary greatly with soil conditions (basically, low-OM high-clay soils take more down-pressure than do more loamy soils – although many other factors come into play, such as length of time in no-till, moisture level, previous crop, soil ‘tilth’ or condition, etc.).
Which brings us to linkages – the way the opener is attached to the toolbar: parallel-link or radial (turning on a single pivot point). A parallel link has the advantage of keeping the blade and the rest of the opener at a constant angle in relation to the soil surface, which is critical to functioning (on a radial linkage, think about what happens to the relationship of the components at various places in the arc of travel). Perhaps more importantly, parallel-links are often configured to have a greater range of effective travel – i.e., the opener’s ability to move both upward and downward from its normal operating position while maintaining down-pressure. Limited effective downward range is a major shortcoming of several radial linkage opener drills currently on the market.
One current craze is the idea of pushing a parallel link, which sounds good in theory, but fails in practice. The linkage gets in a bind, sometimes destroying the opener if it folds under. At a minimum, the linkage doesn’t move smoothly and easily like a trailing linkage.
Aiming the Seed
Getting the seed to the bottom of the ‘v’ seems like a simple task, but the execution by the manufacturers is often lousy. Since the seed is dropped (or blown) from some distance above the opener, and because the planter or drill is moving forward, seed bounce is a significant problem. Ideally, the seed tube and/or boot, plus the opener blade(s), would have the seed under control and not relinquish it until deep in the furrow, and then ensure that the seed does not bounce or roll from that location. Because seeds bounce and flutter around in seed tubes a great deal (it’s not at all nice & neat like in the drawings of the planter literature), any opportunity for them to ‘escape’ often lets them do just that – they’ll end up everywhere but in the bottom of the ‘v.’
A compounding problem is soil and residues falling into the furrow ahead of the seed. As the blade pulls out of the soil, that soil tends to spring back to its original shape to some extent, which often includes some crumbling and partial collapse of the sidewall. Ideally, the seed would already be placed by this point. For this to occur, the seed should be dropping to the bottom of the furrow at roughly the point of the blade’s deepest penetration, or very slightly rearward of this point – many planter and drill designs have the seed drop too far rearward. (Note that I’m not talking about where the seed is released from the seed tube – I’m discussing where the seed would typically reach the bottom of the furrow, which is determined by the position of the seed tube, the angle of discharge, and the velocity of the seed.) The rearward curvature of the common planter seed tube is intended to impart a rearward ‘throwing’ of the seed at the bottom of the tube to minimize seed bounce resulting from the 5-mph difference between the forward speed of the planter (& seed) and the stationary soil ─ fine, unless the sidewall is collapsing in the meantime. Also, in the case of single-disc openers, the seed boot should stay in the ‘shadow’ of the blade – in other words, the boot shouldn’t touch the sidewall, even though it may extend well below the soil surface. A boot that is wider than the furrow will drag – hindering opener penetration, increasing draft loads, and possibly making placement worse by disrupting the unstable sidewall (depending on the exact shape of the boot). In any event, the purpose of all this is to get (and keep) all the seeds in the bottom of the ‘v.’
Note that the issue of controlling seed bounce is even more critical in air delivery systems than in gravity-fed, due to the additional velocity of the seed, and the fact that the pressurized air must escape somewhere along the line, possibly carrying seeds with it. Venting systems, such as venturis or diffusers will help, as will seed tubes angled slightly forward instead of rearward. Air pressures should always be minimized.
Often, seed bounce flaps (poly or rubber) hung off the back of the boot or seed tube will help control seed bounce. These are important in both gravity-fed and air systems and probably don’t get nearly enough attention.
Seed tubes should be as smooth as possible on the inside, which will reduce seed bounce. Plastic seed tubes on double-disc (dd) planters will often wear thin on the sides (from the blades rubbing on them), and eventually the paper-thin material will split and curl inward, causing seeds to bounce erratically at the very end of their path. The current dd planters on the market in the U.S. were all engineered for soft tilled soils and making them work in no-till has always been an afterthought. Consequently, they are built quite light, including the opener blade itself. In structured no-till soils, these thin blades flex inward considerably (drastically). The part that is supposed to protect the plastic seed tube from the blades flexing inward is a metal wedge between the discs, just ahead of the seed tube — called a seed tube guard, frog, or block. Unfortunately, the guards sold by the planter manufacturers wear out in just a few hundred acres, letting the blades flex and destroying the seed tube (note that blade flex is worsened by the discs wearing thin, and that they wear thin very quickly – long before they lose diameter). Another side-effect of the blades flexing is a narrowing of the ‘v’ at the bottom, requiring the opener’s gauge wheels to be set deeper to maintain effective depth, and creating variability in seed placement – the narrowest part of the ‘v’ isn’t useable, since the seed gets hung up before it gets all the way to the bottom (actually, if the blades are prevented from flexing, the shape of the furrow isn’t really a ‘v’ at all, and will have a flat spot on the bottom ~ 0.31 of an inch wide). One other effect is that the blade has flexed inward enough so that the gauge tire may not be flush against the blade any longer, letting mud pull up with the blade and pack into the inside of the gauge wheel. New products are becoming available to address the blade flex issue on dd planters, such as thicker blades and wider seed tube guards with wear-resistant edges.
A cousin of the seed tube guard (frog) is the firming point, which I’ll define as something protruding below the blade(s) when the opener is in the soil. These gadgets may have had some merit for tilled soils but are very detrimental in no-till soils – simply because of the severe smearing and compaction caused by pushing a blunt object into moist soil. At least a hoe-drill allowed the soil to lift.
Seed Firming
Well, finally the seed is in the ‘v’ – now we just need some firming and closing. As previously mentioned, doing both at once (sometimes with the depth gauging function, too) results in poor performance. The resilience of no-till soils prevents firming from the surface downward from being very desirable or effective – often extremely high pressures are needed at the surface to provide any sort of consistent firming pressure at seed depth, which leads to crusting problems and, later, to poor root penetration of the severely compressed sidewalls. Even then, the furrow often remains open, or cracks open as the soil dries, making the seed and seedling vulnerable to weather and predation. Further complications occur when the soil is chunked up by the opener blade(s), which results in enormous variability of soil density and conditions around and above the seed – the only way to make it sort of uniform again is to compress the heck out of it. (Note that doing lots of packing with a press wheel was perfect in dry fluffy tilled seedbeds, but these methods are completely misplaced in a no-till seedbed.)
A better way is to separate the firming and closing functions: this lets you use a small amount of pressure right on the seed and soil at the bottom of the ‘v’ for a very consistent amount of seed-to-soil contact, plus it opens the way for some sort of spoked closing wheel to shatter the sidewall. The firming function can be done with either a sliding device (Keeton) or a wheel, so long as it is narrow enough to fit down into the bottom of the ‘v’ (the wider ones get hung up on the sidewall and don’t do much good), but not so narrow or sharp on the edge as to push the seed off to the side instead of down into the exact bottom of the ‘v.’ The only other real variable is the amount of pressure you can get out of the firming device. Since it is precisely at the point needed, a small amount works wonders. In moist soils with high OM, 1 lb. of pressure may be plenty. Soils with lower OM will need more, and drier soils need lots. Generally firming wheels are designed to exert more pressure than sliding firmers. Sometimes mud adhesion is a problem with certain firming devices, which is usually caused by their being too wide, by their not having enough pressure, by having too much soil disturbance ahead of the firmer, or by having the firming wheel being too small in diameter.
Spoked closing wheels are often beneficial in no-till since the soil qualities (structure, resilience) often make furrow closure challenging. Attempts at squeezing or prying the furrow closed result in inadequate closure, excessive compression of the sidewall, and/or lifting of the sidewall (sometimes tearing the seeds out, too). Some spoked, or tined, closing wheels have rather blunt components engaging the soil, which often provide better closure than traditional smooth (solid) closing wheels, but which will still do too much packing in wet conditions. Some have sharpened tips with very long slender spokes, which can penetrate too deeply and pull the entire sidewall loose, along with the seed – basically rototilling out everything that was so carefully placed. This can be a problem with many spoked closing wheels, since driving a spear-like tooth or spoke into the sidewall and then pulling it out again (as the wheel continues its rotational path) will often result in the sidewall coming along with the spoke. Since the sidewall was compressed by the opener blade, it often comes out in one big chunk and breaks loose at the bottom of the ‘v.’ Since this is where the seed was firmed in, the seed goes along for the ride. Not cool.
Solutions to this involve running very little pressure on the spoked closing wheels (which may inhibit their ability to close), spacing them farther out (again, not so good), or creating spoke shapes and/or angles of operation that prevent their lifting of the sidewall. One way is to make the spokes do more packing, which tends to reduce lifting – we know the drawbacks to this. To get really neat sidewall shattering requires more knife-like action, particularly one that slices thru the sidewall at angles that preclude any lifting.
Really blowing apart the sidewall (after the seed is placed and firmed) not only allows rapid emergence (loose soil over the seed, easy to push out, optimal exchange of gases) and a consistent depth of material over the seed, but also disrupts the root-restrictions posed by the sidewalls smearing caused by the opener blades – as long as the roots can find a fissure, they can grow through the restriction (the key is providing the fissure). In some cases, spoked closing can leave the soil a little too loose, or uneven – in those conditions it may be useful to have a heavy drag chain trailing along to settle it.
Anything Out in Front?
How about a ripple or wavy coulter in front of the row unit? Generally, these are used for a couple purposes, such as reducing hairpinning by the seed opener, taking some of the stress away from the seed opener, etc. But their primary purpose is to fluff up enough soil so that the firming and closing systems that were designed for loose conditions can function again. Unfortunately, this is only somewhat effective at re-creating the dry fluffy conditions of a tilled seedbed, and in wet conditions the coulter merely throws ribbons of mud everywhere and clogs up the seed opener. Very aggressive coulters can do a substantial amount of tillage and will completely bury any residues remaining in or near the row – ideal for crusting. Rather than installing a coulter to till a zone so that the antiquated firming and closing system will work, why not just fix the problem at its source? – You will be much better off in the long run.
If you’d like to move some material out of the path of the opener without resorting to the tillage of a coulter, consider a residue manager. These devices, also called row cleaners (or ‘trash’ whippers), can sweep some big lumps of residue out of the way to allow the opener to function better—primarily by reducing hairpinning and allowing more accurate depth control. Clearing a strip also allows faster soil warming and can reduce allelopathic effects of old crop residues on the newly planted crop. Residue managers should never move soil (some designs tend to do this more than others) and really shouldn’t move all the residue either (moving too much opens the door for crusting, as well as water washing along the row). Generally, the more you move stuff around, the more likely it is to plug something up coming along behind.
There are two basic designs of row cleaners: those that float, and those that are carried by the row unit in a semi-fixed position. The jury is still deliberating on which is best. Some other design choices are two wheels vs. one (one is plenty, if properly designed), straight teeth vs. directional – ‘forward-swept’ to not fling residue, and possibly springy teeth instead of rigid.
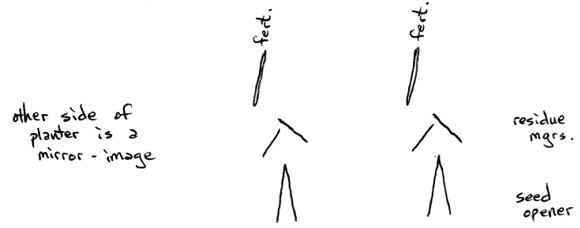
Row cleaners work best when something is cutting out in front. Position these components so that the leading residue wheel pulls from the cut side, like this:
The part doing the cutting often doubles as a fertilizer opener, which can be run quite shallow (no need to place deep – same depth as seed is good), and should be 2.5 to 3 inches off to the side of the seed furrow. For fertilizer openers, low disturbance is best, since any mud or residue being pulled up by these will meet up with the seed opener very quickly, causing problems. Sometimes just a straight (flat) coulter or one with very small ripples is okay, with an injection nozzle behind. A more foolproof opener has a gauge or wiper wheel alongside, to keep the soil from peeling up as the blade exits the soil.
Putting the Pieces Together
All of these items can be arranged in various ways on a toolbar. One idea that has gained some currency is mounting both the fertilizer opener and the residue manager on the planter’s opener unit (instead of having the fertilizer opener mounted directly to the toolbar). This makes some sense on planters with limited space in front of the row unit, although realize that the down-pressure system for the row unit must then force 2 openers into the soil instead of just one—the down-pressure springs may not have enough ‘oomph’ to do both.
Also, be aware that funneling lots of residue between any two row units can create plugging problems—ideally, all the residue managers on each half of the planter move material all in one direction (preferably toward the outside).
Do I need all of this stuff right away? Maybe, maybe not. Depends on soils, climate, rotations, etc. And achieving top-notch stands with minimal seed drop will only be important if the other aspects of your farming operation are functioning well.
Parting Thoughts
I have seen $100,000 seeders fail miserably, due either to engineering ‘brain-cramps’ or operator shortcomings. I have also seen $5,000 seeders work great. Some old designs are actually better seeders than some of the new stuff on the market. Sometimes the old designs are being sold as ‘new’ with a new model number and some fancy decals and a slick coat of paint. Salesmen are often less knowledgeable than what they’d like you to believe, and some are outright liars and charlatans. Take everything, they say with a shaker full of salt. If you do not understand what exactly makes one design different from another, study it some more, or test it out (in a variety of conditions). Crunch the numbers—how much per acre will this new machine or attachment cost per year? Will there be cost savings or yield increases enough to not only pay for it but provide a return beyond the investment? How certain are you about those benefits? Upgrade only when the answer is obvious. But whatever seeding tool you run, make sure you get the most out of it—proper maintenance and adjustment will typically pay for themselves many times over.
Experimentation and observation are almost free—why not do more? Yes, conditions and details and results will vary considerably, and thinking about all that is hard work—we’d rather have the answers handed to us or pay someone to provide them. Yet management is something more—you can’t simply borrow or buy a recipe for success. Hiring expertise is wise. Education is good. The problem is whom to hire, and where to get educated. Not to mention the issue of applying the acquired knowledge to an existing operation in a way that will make it worthwhile and remaining vigilant for the potential pitfalls created by gaps or errors in that knowledge base or its application. No one said this management stuff was easy.
Copyright 2002 Exapta Solutions Inc. All rights reserved: reprint with written permission only.